Environment Setup#
This guide will walk you through setting up your environment for automated systematic literature searches.
Prerequisites Check#
Before we begin, let’s check what you need:
Python 3.7 or higher
Package manager (conda/pip)
Code editor (VS Code recommended)
Internet connection
Git (for version control)
API keys (Scopus, IEEE)
Institutional database access
Step 1: Install Python Environment Manager#
If you already have Anaconda, Miniconda, Miniforge, or Mamba installed, you can skip to Step 2.
Option A: Miniforge (Recommended)#
Miniforge is a minimal conda installer with conda-forge as the default channel.
Windows:
Download the installer: Miniforge3-Windows-x86_64.exe
Run the installer and accept default options
At Advanced Installation Options, consider checking:
✅ “Add Miniforge3 to my PATH environment variable” (recommended)
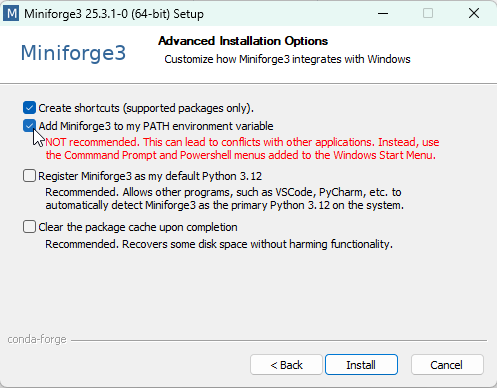
Why add to PATH?
Adding to PATH allows you to use
condacommands from any terminal, not just the Miniforge Prompt.
macOS/Linux:
# Download and run the installer
wget https://github.com/conda-forge/miniforge/releases/latest/download/Miniforge3-Linux-x86_64.sh
bash Miniforge3-Linux-x86_64.sh
Option B: Anaconda (Alternative)#
Download from anaconda.com/download and follow the installation wizard.
Step 2: Install Code Editor#
Visual Studio Code (Recommended)#
Download from code.visualstudio.com
Install with default settings
Install recommended extensions:
Python (by Microsoft)
Jupyter (by Microsoft)
Markdown All in One
Alternative Editors
You can also use JupyterLab, PyCharm, Spyder, or any editor you prefer.
Step 3: Create Virtual Environment#
Virtual environments keep your project dependencies isolated. Let’s create one for our systematic review tools.
Open Your Terminal#
Windows:
If you added conda to PATH: Use PowerShell, Command Prompt, or Windows Terminal
If not: Search for “Miniforge Prompt” in Start menu
macOS/Linux:
Open Terminal application
Create the Environment#
# Create a new environment named 'autosearch' with Python 3.10
conda create -n autosearch python=3.10 -y
# Activate the environment
conda activate autosearch
You should see (autosearch) appear in your terminal prompt:
(autosearch) C:\Users\YourName>
Environment Activation
You’ll need to activate this environment every time you start a new terminal session:
conda activate autosearch
Step 4: Install Review Buddy#
Review Buddy is a production-ready toolkit for systematic reviews with a simple 3-step workflow.
Clone the Repository#
# Clone from GitHub
git clone https://github.com/leonardozaggia/review_buddy.git
cd review_buddy
Or download the ZIP file from GitHub and extract it.
Install Dependencies#
# Install required packages
pip install -r requirements.txt
This installs:
Core dependencies (requests, lxml, beautifulsoup4, tqdm, bibtexparser)
Optional: scholarly (Google Scholar), langdetect (language filtering)
Configure API Keys#
# Create .env file from template
cp .env.example .env
The .env file is already added to .gitignore to keep your keys private!
Edit .env file with your API keys (at least one required):
# Recommended: Scopus (best coverage)
SCOPUS_API_KEY=your_scopus_key_here

# Recommended: PubMed (biomedical papers)
PUBMED_EMAIL=your.email@example.com

# Optional but helpful
UNPAYWALL_EMAIL=your.email@example.com
IEEE_API_KEY=your_ieee_key_here
Verify Installation#
# Run a quick test
python 01_fetch_metadata.py
You should see available sources listed. See the Review Buddy Installation Guide for detailed setup instructions.
Step 5: Database API Keys (Optional)#
Some databases require API keys for full access. Here’s how to obtain them:
Scopus API Key#
Create an account or log in
Navigate to “My API Key”
Request an API key (may require institutional email)
IEEE Xplore API Key#
Visit IEEE Developer Portal
Create an account or log in
Navigate to “My APIs”
Request an API key (usually instant approval)
Storing API Keys
To store your API keys as environment variables:
Windows (PowerShell):
$env:IEEE_TOKEN = "your-ieee-api-key"
$env:SCOPUS_TOKEN = "your-scopus-api-key"
macOS/Linux:
export IEEE_TOKEN="your-ieee-api-key"
export SCOPUS_TOKEN="your-scopus-api-key"
For permanent storage, add these to your .bashrc, .zshrc, or PowerShell profile.
This step is optional, you can rely on the .env file -> see Step 4.
Step 6: Verify Your Setup#
Let’s run a quick test to ensure everything is working:
For Review Buddy (Recommended)#
# Navigate to review_buddy folder
cd review_buddy

# Run the fetch script
python 01_fetch_metadata.py
You should see available sources listed. If you see “No API keys configured”, edit your .env file.
Troubleshooting#
Common Issues#
Solution:
Use Miniforge Prompt instead of regular terminal
OR reinstall with “Add to PATH” option checked
Solution:
Run terminal as Administrator (Windows)
Use
sudoon macOS/LinuxCheck firewall/antivirus settings
Quick Reference Card#
# Activate environment
conda activate autosearch

# Check findpapers version
findpapers version

# View available commands
findpapers --help

# Deactivate environment (when done)
conda deactivate
What’s Next?#
🎉 Congratulations! Your environment is ready. Choose your path:
➡️ Review Buddy Tutorial - Production-ready 3-step workflow with advanced filtering
Additional Resources#
Need Help?